Writing a Technical Specification for Feature Development
by Bart Gryszko
Note #1 I’ll be sharing a front-end engineer's perspective on the topic, but a
lot of it should be applicable to back-end work as well.
Note #2 What is a "cycle"? A couple of years ago, we adopted a process
inspired by Shape Up and refined this approach
to suit our needs. This means that we split our team into feature teams for 6
weeks during which development happens — this is "a cycle". Then there is a
2-week break (aka "gap weeks") when we work on bug fixes, technical debt, and
technical specification. If you are assigned as a project lead for the upcoming
cycle, you’ll be responsible for creating such a technical specification.
Why Write a Technical Specification?
There are several reasons why we do technical speccing before jumping into
coding:
Increase the probability of shipping on time and create more accurate
ETAs: A well-thought-out plan helps in setting realistic expectations.
Understand project priorities: Identifying the most critical parts from a
product perspective allows us to prioritize work accordingly.
Evaluate the cost of smaller pieces: Some parts might require more effort
than we actually want to invest which can influence the scope of the project.
Coordinate multiple engineers: Figuring out how to split up and
parallelize work helps in coordinating multiple engineers effectively,
ensuring that everyone knows their responsibilities and can work
simultaneously.
Create a reference plan: A written plan can be reviewed by other
engineers to ensure everyone is on the same page regarding what we'll ship.
Smooth transition into coding: It acts as a warm-up, making the actual
coding phase smoother. It helps explore different options, uncover edge
cases, and answer questions about how things will actually be used, reducing
confusion and misunderstandings.
What is a Technical Specification?
A technical specification is a detailed document that outlines the technical
requirements and implementation plan for a feature or project. To provide you
with a high-level overview before diving into the details, here is how a
Technical Specification at Close might look:
Executive Summary: A high-level summary of the project, including its
goals, business context, and important dates related to the project.
Team Availability: Consideration of team members' availability, including
vacations, holidays, and other commitments.
Prioritized Deliverables: A list of sections of what will be delivered,
broken down into smaller, manageable parts.
Designs: Attached designs and mockups that illustrate what will be built.
Timeline: Key milestones and a timeline for the project to ensure timely
delivery.
References: Links to related specifications, tooling, designs, etc.
Currently, we store technical specifications as Dropbox Paper documents. These
documents are properly named for easy retrieval, such as
2024C2 Workflows Frontend Spec.
The Process of Writing a Technical Specification
Over the years at Close, we have balanced how much time we spend on speccing and
how detailed it should be.
1. Start High-Level
Begin with a product specification. If you don’t have one, start with
understanding the business context and goals of the feature. Typically, it is up
to our product team to write the product specification. Internally, we assign
priorities to each element of the feature we are building. The project lead
often negotiates the scope with the product team to ensure feasibility within a
single 6-week cycle. With this in mind, review the product spec to ensure:
Deliverables are as small as possible while still providing business value.
Naming conventions make sense and will be good to reuse in the the technical
spec too.
Priorities are clearly defined. We use the following levels to ensure we get
enough done:
P0 (Critical): The project would fail to deliver value without this element.
P1 (High): This element would add great value; usually it is a stretch goal.
P2 (Medium): This element is nice to have; it is a stretch goal.
P3 (Low): This element has the lowest priority.
2. Review Designs
Attach designs to the specification to understand what will be shipped. Split
the project into sub-sections if needed and bring up any suggestions to the
designs team:
Are designs composed of existing UI blocks?
Are there any discrepancies with global components?
Are there quick wins, like existing components that we could use?
Are new patterns, colors, sizes, or alignments necessary?
The engineering team often contributes to the development of the mocks by
ensuring that designs are feasible and optimized for implementation. Engineering
input provides feedback on technical constraints and potential improvements.
Example section at this point:
P0: Add support for “Assign Lead” action
Lead assignment is one of the first use cases we want to solve with Workflows.
The assign lead action will allow teams to set a User type custom field on the
lead in their workflows.
3. Explore the Context of the Feature
If the new feature touches an existing area, understand the whole context where
it will live. We build our app in React so I’d click through the existing UI and
review the code:
Will the containing component need updates?
Are we using up-to-date or legacy patterns?
How will data requirements change?
Are there existing patterns or components to reuse?
How well-tested is the existing code?
Example after filling in more details:
P0: Add support for “Assign Lead” action
Lead assignment is one of the first use cases we want to solve with Workflows.
The assign lead action will allow teams to set a User type custom field on the
lead in their workflows.
[Link to design mockups]
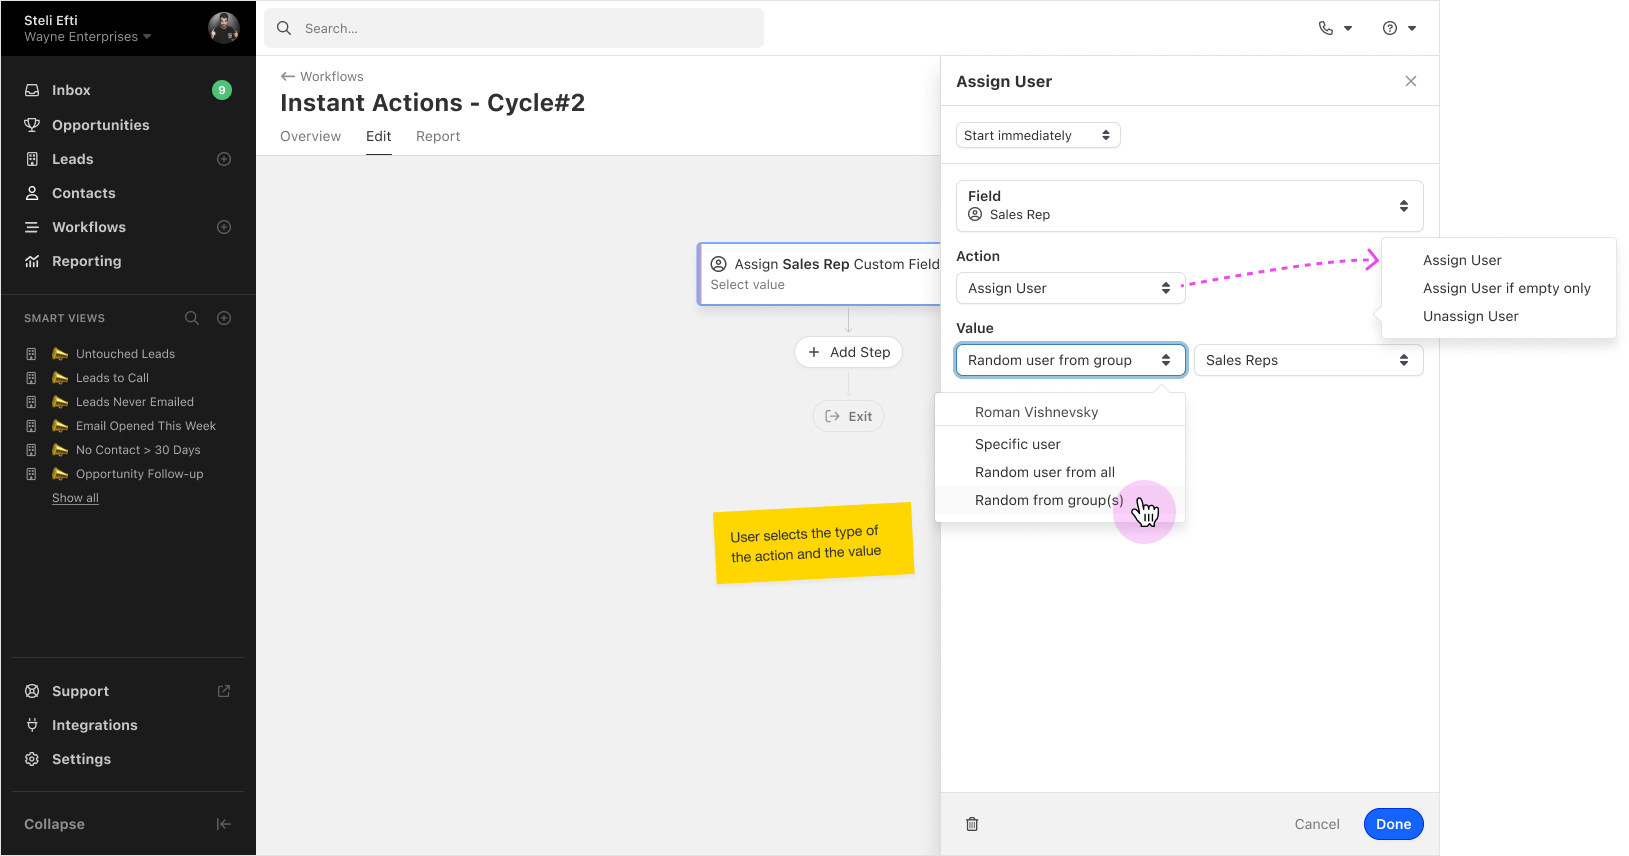
Add AssignLeadEditModalForm component to be rendered in the EditModal
[link to the component in GitHub]
It’ll need to render and support the following Formik fields:
Custom Field — steps.{index}.custom_field_id
Action — steps.{index}.assign_action with the following values:
Assign
Only assign if empty
Unassign
Value type — steps.{index}.assign_type
Specific user
Random user from all
List of all Users from the organization
Random users from group(s)
Value — steps.{index}.assign_user_or_group_id
Specific user
If the organization has Groups, they should be listed as well
Random users from group(s)
Allows multi-select of Groups in field
4. Estimation and Timeline
After adding details to the spec, the next critical step is to provide
estimates. Accurate estimation is essential for planning and setting realistic
expectations. Here’s how I approach this phase:
Break Down Sub-Features
First, break down the feature into the smallest possible pieces that still
provide meaningful functionality. Each piece should function independently, have
a clear deliverable, and be testable. This approach simplifies estimation and
helps identify potential complexities early.
Provide Realistic and Conservative ETAs
When estimating, I usually give a range that includes both a realistic and a
conservative estimate. This approach accounts for unexpected challenges that
might arise during development. Here’s how I think about estimation:
Use Past Experiences: Base your best-case scenario on similar tasks you’ve
completed in the past. This guess or hunch is grounded in your previous
experiences.
Consider Complexities: For the conservative scenario, recall instances
where seemingly simple changes turned out to be complex. This helps you
prepare for potential pitfalls.
Keep Ranges Reasonable: The difference between optimistic and conservative
estimates usually won't exceed 1-3 days.
Focus on Smaller Tasks: Smaller tasks are easier to estimate accurately.
Break down larger tasks into smaller ones.
Keep it high-level: My absolute minimum time is 0.5 days. For very small
tasks, group them together to provide a more accurate estimate.
Example header update with estimates:
P0: Add support for “Assign Lead” action 2-4d
Consider Technical Questions
During estimation, I re-read everything that I specced already for a given
section to uncover any complexities but also try to answer more technical
questions such as:
Testing Requirements: How much time will it take to write tests for this
feature? Will I need to create new test cases or can I leverage existing ones?
Reusability of Existing Setup: Is there an existing testing setup that I
can reuse? Are there mocks in place? Can I reuse a higher-level component?
Migration to New Stack: Is the component and its context already written
in TypeScript (any new tech that you are currently migrating to — in our case
it's TS)?
Integration with Existing Code: How well-integrated is the new feature
with the existing codebase? Will it require any refactoring? Am I making
changes that could affect other parts of the system globally, and potentially
break them?
Future Scope and Planning: Are there things we've pushed out of the scope
for this cycle that we want to do soon? Am I creating this in a way that sets
us up to do that work later? This ensures we keep an eye toward the future
without doing a ton of extra work for things we aren't shipping yet.
Scheduling Work
Once I have my estimates, I plan how to distribute the work among team members.
Here are some key considerations:
Parallelization: Identify tasks that can be worked on simultaneously
without causing conflicts. Determine if there is a critical piece of work that
several other tasks depend on and prioritize completing it early.
Product Priorities: Ensure that we are keeping product priorities intact
and can ship features incrementally.
Account for Non-Working Days: Consider non-working days such as holidays
and team members' vacations. Also, account for other obligations like
recruiting or involvement in different projects. This helps in understanding
the true number of working days available for each person.
Book Last Week for Feature Polish: Avoid scheduling any critical work in
the last week of the 6-week cycle to prevent spillover into the gap weeks
(time to move on to other things). Instead assume you'll need that time to fix
bugfixes and polish the feature after its release.
Create GitHub Issues & Timeline
After drafting the timeline, confirm it with the team to ensure everyone agrees
on what will be possible within the cycle to ensure we've set realistic goals
and expectations. Once the timeline is agreed upon, I would usually create
GitHub Issues for the project. Each issue will mostly be a copy of each
previously created sections. Putting issues into a Github Project makes it
easier to track and share progress.
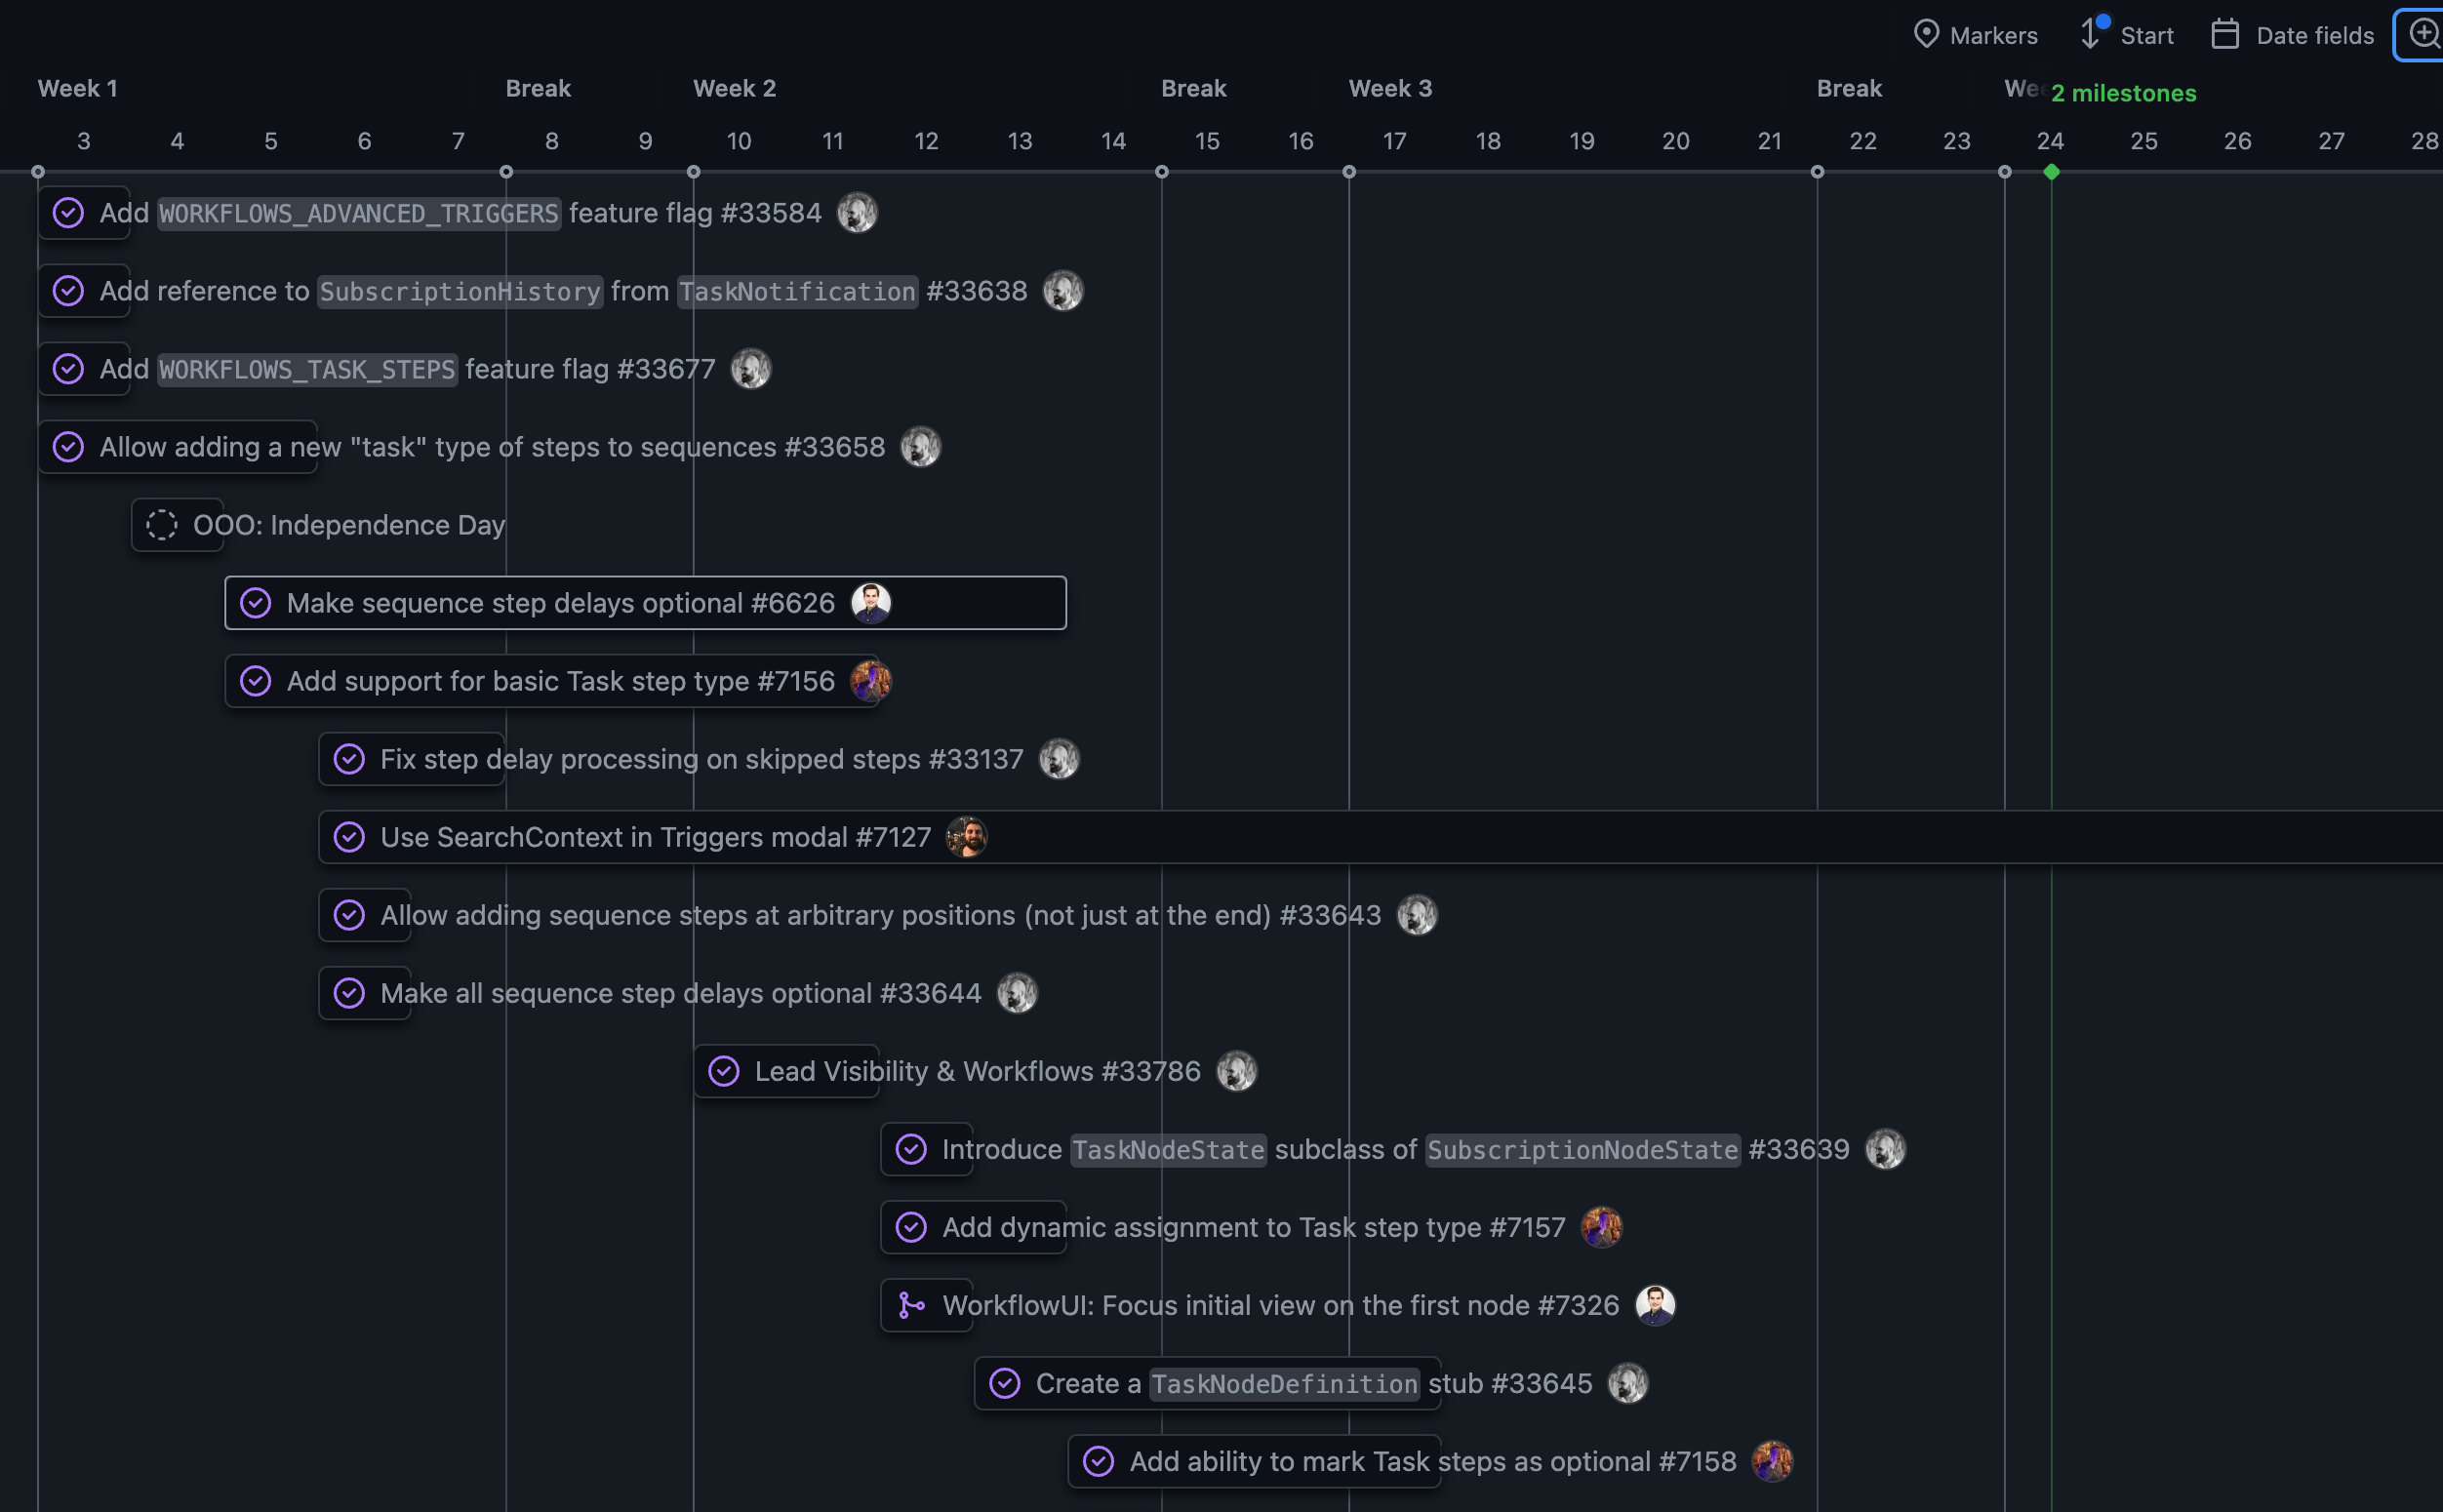
Example timeline setup:
Conclusion
Writing a technical specification is a crucial step in feature development at
Close. It not only helps in planning and prioritizing work but also ensures
smoother and more predictable project execution.
Over time, we refined our approach, focusing on delivering value within a fixed
6-week timeframe and allowing for flexible scope. This balance ensured our
projects were manageable and provided value. By creating technical specs for
self-contained projects, we make the review and development processes easier.
This approach keeps us from getting stuck on features that take months to
deliver actual value to the customer.
How do you approach speccing feature development work? Do you have any questions
or suggestions? You can let me know on X
@bartgryszko.